Wednesday, November 6, 2013

PIC Serial Communication Tutorial (UART)

First, a quick history of RS232. What is RS232? It's just a name for a standard that has propagated from generation to generation of computers. The first computers had serial ports that used RS232, and even current computers have serial ports (or at least USB ports that act like RS232 ports). Back in the day, serial information needed to be passed from devices like printers, joysticks, scanners, etc to the computer. The simplest way to do this was to pass a series of 1s and 0s to the computer. Both the computer and the device agreed on a speed of information - 'bits per second'. A computer would pass image data to a printer at 9600 bits per second and the printer would listen for this stream of 1s and 0s expecting a new bit every 1/9600 = 104us (104 micro-seconds, 0.000104 seconds). As long as the computer output bits at the pre-determined speed, the printer could listen.
Zoom forward to today. Electronics have changed a bit. Before they were relatively high power, high voltage devices. The standard that is 'RS232' dictates that a bit ranges from -12V to +12V. Modern electronics do not operate at such high positive and negative voltages. In fact, our PIC  runs 0V to 5V. So how do we get our 5V micro to talk the RS232 +/-12V voltages? This problem has been solved by the IC manufacturers of the world. They have made an IC that is generically known as the MAX232 (very close to RS232, no?).
The MAX232 is an IC originally designed by a company called Maxim IC that converts the +/-12V signals of RS232 down to the 0/5V signals that our PIC  can understand. It also boosts the voltage of our PIC  to the needed +/-12V of the RS232 protocol so that a computer can understand our PIC  and vice versa. To get our PIC  IC sending serial characters to a computer, we have to send these serial signals through a MAX232 circuit so that the computer receives +/-12V RS232 signals. Don't worry if you're working with a chip labeled 'ICL232' or 'ST232' - these are just generics of the MAX232. Everyone says 'MAX232'. The ICs all function the same and nearly all have the same pinout.


                                                                 Discussion Group

Circuit


FM Radio jammer


FM Radio jammer


Description.
Circuit shown here can be used to jam FM radios in its vicinity. The circuit is nothing but a classic single transistor oscillator operating in the VHF region. Working principle of the circuit is very simple and straight forward. Powerful VHF oscillations from the circuit will interfere with the FM signals to nullify it. Jammer circuits like this are illegal in many countries and you must assemble this circuit on your own responsibility. This circuit is intended only for fun and i request you not to misuse it.
Circuit diagram.
FM radio jammer
Notes.
  • For L1 make 6 turns of 16AWG enamelled copper wire on a 9mm plastic former.
  • The circuit can be powered using a 9V PP3 battery.
  • For extended range, use an antenna.
  • A 30cm long wire connected anywhere on the coil will do for the antenna.
  • For better performance, assemble the circuit on a good PCB.


Reference : www.circuitstoday.com, www.wikipedia.com, www.microcontrollerprojects00.blogspot.in

Sunday, September 1, 2013

Heart rate monitor using 8051

In this article we are listing all the projects and circuits we have developed using the 8051 micro controller. We have tested all of these projects in our lab and verified the working . All these projects are made to solve a real world requirement or problem. Engineering students & other diploma students will find these projects useful for their mini project and main project requirements.
All the 8051 projects listed below are made using the 8051 compliant microcontroller from Atmel – AT89S51.  We have given the correct circuit diagram, working and software code (in assembly language) for each and every project. You can use all of them freely for your project & learning requirements. In case you are using a controller other than AT89S51 – please be sure to check the hardware of your controller and compare it with that of AT89S51. This is necessary because we have developed all the software in assembly language. If you are not that good at assembly language, you can convert the software into C language & use it with any compliant  8051 controller.
8051 micro controller based projects & circuits
Image Source
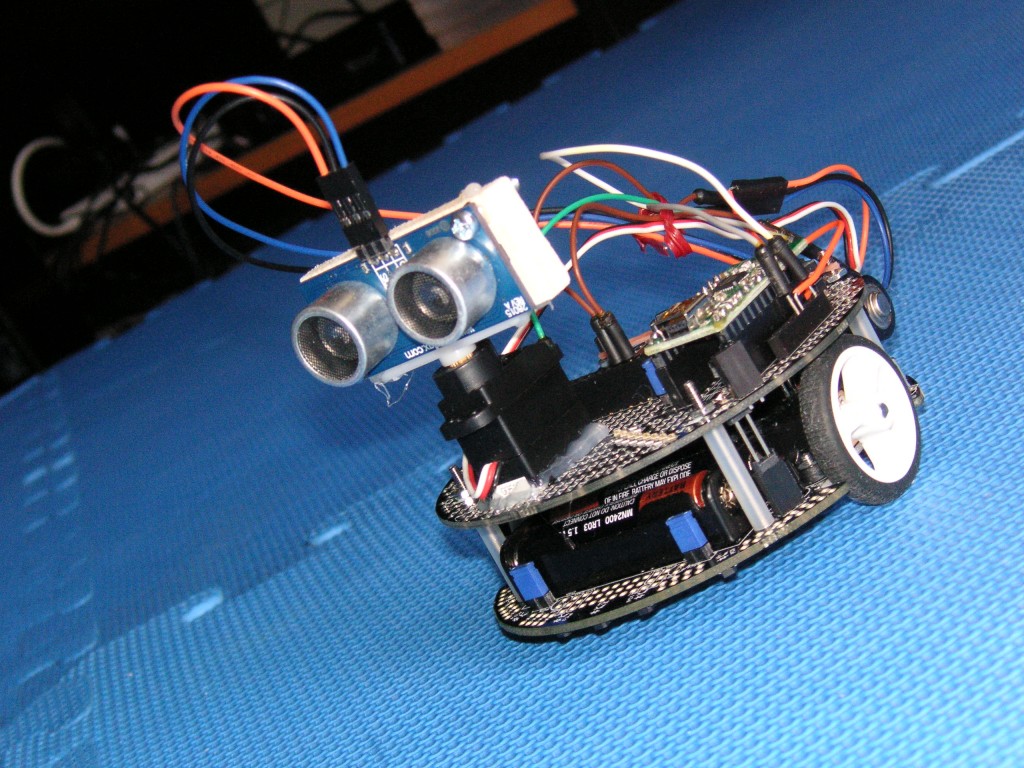
1. Ultrasonic Range Finder using 8051 – This project as the name says, is an application to measure distance of an object. It uses an ultrasonic transducer module HC-SR04 to measure the distance and the controller AT89S51 to make the necessary processing. This project can be used to make applications like Automotive parking sensor, Obstacle warning systems, Terrain monitoring robots etc. This ultrasonic range finder can measure distances upto 2.5 meters with an accuracy of 1 cm.
2. Digital Tachometer using 8051 –  This project is a digital tachometer which can be used to measure the revolutions per second of any object like a rotating wheel or a disc or a shaft. This application built using 8051 micro controller can measure upto 255 revolutions/second with an accuracy of 1 rev/sec. This application has 3 important sections – 1) is the optical pickup designed to pick the revolutions of the object using a photo transistor and LED. 2) is the processing stage designed using 8051 and the associated software 3) is the display section using 7 segment displays.
3. Water Level Controller using 8051 –  This is one of the most popular project we have published using 8051 controller. This water level controller monitors the level of the over head tank  and automatically switches on the water pump when ever the level goes below a preset limit. The level of the over head tank is indicated using 5 leds and the pump is switched of when the over head tank is filled.  We have given an illustrated circuit diagram with working explained in detail. You will also find the software codes written in assemble language.
4. Voltmeter using 8051    - We all must have used a multimeter from our young days. Have you ever bothered to create one ? So here is one such an interesting project. A Voltmeter using 8051 micro controller. Even though its quiet simple and an easy to make one, you shall find it really interesting. This can be used as an application at the mini project level for engineering and diploma students. This digital voltmeter  can measure 0 to 5 volts and has a sensitivity of  200mV which is a bit low but this project is meant for demonstrating how an ADC and seven segment display can be interfaced to 8051 to obtain a digital readout of the input voltage. ADC0804 is the ADC and AT89S51 is the controller used in this project.
5. Thermometer using 8051 - This is an interesting project designed to measure temperature using 8051. Its a simple 0-100°C digital thermometer with 1°C resolution using 8051. The circuit is based on LM35 analog temperature sensor, ADC0804 and AT89S51 microcontroller. LM35 is an analogue temperature sensor IC which can measure a temperature range of -55 to 150°C. Its output voltage varies 10mV per °C change in temperature.
Knowledge Resources:- The articles below given are basics on how to work with 8051 micro controller. You can refer them if you come across a road block anywhere!
1. Interfacing 7 segment display to 8051 – A good tutorial on interfacing 7 segment display to 8051 micro controller.
2. Interfacing LCD display to 8051 – Explains how to interface a 16×2 LCD display with 8051 micro controller.
3. Interfacing DC motor to 8051 – Explains how to interface a DC motor with 8051 micro controller.
4. Interfacing push button switch to 8051 – Interfacing LED & Push button switch to 8051 micro controller.
5. Interfacing ADC to 8051 – This articles gives you a good detail on how to interface ADC to 8051 micro controller. ADC 0804 is used to explain the interfacing procedure with an example software routine.

Alcohol Breathalyzer circuit using 8051 microcontroller (AT89S51).

This article is about a breathalyzer circuit using 8051 microcontroller which outputs the blood alcohol content (BAC) from the breath. The BAC is displayed in percentage on a 3 digit seven segment display. The microcontroller used if AT89S51 which belongs to the 8051 family and the alcohol sensor is MQ135 gas sensor from Futurelec.

MQ135 gas sensor.

MQ135 is a stable and sensitive gas sensor which can detect  ammonia, carbon dioxide, alcohol, smoke, nitrogen dioxide etc. The sensor consists of a tin dioxide sensitive layer inside aluminium oxide micro tubes, measuring electrode and a heating element inside a tubular aluminium casing. The front end of the sensor is covered using a stainless steel net and  the rear side holds the connection terminals.
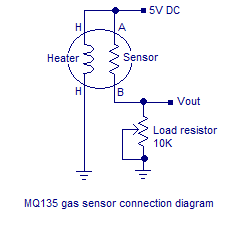
The ethyl alcohol present in the breath is oxidized into acetic acid while passing over the heating element. This ethyl alcohol falls on the  tin dioxide sensing layer and as a result its resistance decreases. This resistance variation  is converted into a suitable voltage variation using an external load resistor. The typical connection arrangement of an MQ135 alcohol sensor is shown below.
mq135 alcohol sensor
MQ135 alcohol sensor
MQ135 has different resistance values at different temperature and different concentration of gases. The manufacturer recommends to calibrate the sensor at 100ppm of ammonia or 50ppm of alcohol. The recommended value of the load resistor is between 10K to 47K.

Circuit diagram.

Breathalyzer using 8051

The voltage output of the alcohol sensor is converted into a digital format using the ADC0804 (IC1). The Vref/2 pin of the ADC is held at 1.28V using the voltage divider network made of R14 and R15. Vref/2 =1.28V means the step size of the ADC will be 10mV and the output of the ADC will increment by one bit for every 10mV increment in the analog input. Refer the datasheet of ADC0804 for a better grasp. Digital out of the ADC (D0 to D7)  is interfaced to Port1 of the microcontroller. Control signals CS, RD, WR, INTR are obtained from the microcontrollers P3.7, P3.6, P3.5, P3.4 pins respectively. R9 and C1 are associated with the clock circuitry of the ADC0804.
Capacitor C3 connected between Vin+ and Vin- of the ADC0804 filters of noise (if any) in the sensor output. If C3 is not used the digital output of the ADC will not be stable. This filter capacitor will surely induce some lag in the ADC response but it is not very relevant in this entry level application. The microcontroller performs required manipulations on the ADC digital output in order to convert it into BAC % and displays it on the three digit seven segment display. Port0 of the microcontroller is interfaced to the multiplexed three digit seven segment display. The drive signals for the threes digits are obtained from the microcontroller’s P3.0, P3.1, P3.2 pins respectively.

Program.

ORG 00H
MOV P1,#11111111B
MOV P0,#00000000B
MOV P3,#00000000B
MOV DPTR,#LUT
MAIN: MOV R4,#250D
      CLR P3.7
      SETB P3.6
      CLR P3.5
      SETB P3.5
WAIT: JB P3.4,WAIT
      CLR P3.7
      CLR P3.6
      MOV A,P1
      MOV R5,A
      SUBB A,#86
      JC NEXT
      SETB P3.3
      CLR PSW.7
NEXT: MOV A,R5
      SUBB A,#115D
      JNC LABEL
      MOV A,#00000000B
      CLR PSW.7
LABEL: MOV B,#5D
       MUL AB
       MOV B,#8D
       DIV AB
       MOV B,#10D
       DIV AB
       MOV R6,A
       MOV R7,B
DLOOP:SETB P3.0
      MOV P0,#01000000B
      ACALL DELAY
      CLR P3.0
      SETB P3.1
      MOV A,R6
      ACALL DISPLAY
      MOV P0,A
      ACALL DELAY
      CLR P3.1
      SETB P3.2
      MOV A,R7
      ACALL DISPLAY
      MOV P0,A
      ACALL DELAY
      CLR P3.2
      DJNZ R4,DLOOP
      SJMP MAIN
DELAY: MOV R3,#255D
LABEL1: DJNZ R3,LABEL1
        RET
DISPLAY: MOVC A,@A+DPTR
         CPL A
         RET
LUT: DB 3FH
     DB 06H
     DB 5BH
     DB 4FH
     DB 66H
     DB 6DH
     DB 7DH
     DB 07H
     DB 7FH
     DB 6FH
END

Notes.

  • The MQ135 gas sensor requires around 5 minutes of preheat before the first use.
  • The MQ135 takes few minutes to retrace back to its normal condition after a positive test (alcohol present in the breath).
  • If there is no alcohol in the breath  the sensor output will swing back to its normal condition very fast.
  • Read these articles Interfacing seven segment display to 8051 microcontroller , Interfacing ADC to 8051 microcontroller  before attempting this project.
  • This breathalyzer circuit is just an entry level one and is not suitable for high end applications such as law enforcement or laboratory application.
  • The logic for converting the digital output of ADC into BAC percentage was obtained using approximation techniques.

Thursday, August 1, 2013

Online Work


Are you interested in making money online ???

Thanks to the Internet there are now hundreds of opportunities to work online from home using your ordinary computer. Our company is doing online job consultancy for everyone and we wants that you can make money online working from home using these methods and our guidance. These opportunities are open to all including working, housewives, teens*, students etc.


A computer and an internet connection is the basic requirement.

If you want…
  • If you want to do PART-TIME or FULL TIME JOB from Home
  • If you want a Very Good Monthly Income Easily at home
  • If you are tired to work hard to earn your daily needs
  • If you don’t want to go any office and want to work from home
  • If you are tired to obey Boss rules
  • If you tired with your daily routine life and want a financial change.
  • If you can spare only 1 to 2-3 hours daily
  • If you really want to do Easy Online Computer Based Jobs


Can Anyone Make Money Online Working From Home?

Of course. Many thousands of people do. You might have friends or family members who make a living with a home-based Internet business already.

Who can start this business?

Now the question comes that Who can start this business ?
  • You will only need a internet connection on your computer.
  • No issue if you are using internet very first time, or you are a good experienced.
  • You can do it with your own computer or anywhere like cyber-cafe.
  • You will have to give some minutes to few hours only to do this all
  • No skill on computer is required whether you are a housewife, a student, retired person,already working in a company, own business etc. anyone can start working.

If you want to start NOW… then you are at right place…


Sunday, June 16, 2013

STM32F4 Discovery Tutorial 1 Using NETMF - Setting Up the Environment


STM32F4 Discovery


I received my STM32F4 Discovery board few days ago. During these days I am searching for a good compiler for the STM32 which is free or provide a better code sized free version. I am already working in .Net environment using C#, and I it is pretty good. In Google search I saw STM32F4 programming using  .Net, the below link.
We are using a .net port for STM32F4, it is .Net micro framework. 
I am using Visual Studio Ultimate 2010 (Compatibility of others is not known).
I hope you have an STM32F4 Discovery Board.
Necessary Tools
1.      STM32 ST-LINK Utility            Get It ->
2.      USB Micro and USB Mini cable.
3.      .NET MicroFramework SDK  Get It ->  
4.      Download these files (Evaluation purpose only driver)
                                                              i.      If you are not a member, join
Install all the softwares.
 
Steps to follow: Click here

Smart Home : The Project

ABSTRACT
Smart home technology has proved to contribute to increased independence and safety. Smart Home Technology is a collective term for information and communication technology in homes, where the components are communicating through a local network. The technology may be used for monitoring, alarming and executing actions, according to the programmed criteria. These project includes a high level security system informs the authorized person and to the police station by a dedicated software using internet. The heart of the project is a Web Server running on an ARM Cortex M4 microcontroller. There are various sensors, devices connected to this device for security system, control and monitoring. Dedicated softwares are there for user (.Net and Android) and police station (.Net). The user software can control the devices in home, view various sensor readings, status of security system, change configuration etc. The application used in the police station use maps of local area to provide the intruder alert. The software used in police station will be communicating with this home server and if an intruder is detected, it will be shown in the software as a location in map and a notification message which makes their duty easily. Same time the house owner will be informed by the user software. The software communicates to the Smart Home Device using UDP protocol. The user software is compatible for future developments like camera interfaces. 


courtesy : http://microcontrollerprojects00.blogspot.in
read full

Tuesday, June 4, 2013

Multidoor Cordless Alarm

Thwart the attempt of burglary by detecting intrusion with this alarm circuit. Each door is protected by a separate circuit built around an independent 555 timer IC in conjunction with reed switch magnet. All the three units are powered from a single power source. The buzzer can be plugged into the earth line of a socket in any room of the same building having proper earth line connection. There is no need of laying external wires up to the buzzer unit from different rooms.

Fig. 1: Cordless multidoor alarm
For door-1 alarm unit, connect reed switch S1 near the magnet of gate 1. Wire IC1 as a frequency oscillator and set door-1 alarm unit to the desired frequency, say, between 1 Hz and 3 Hz, using VR1. For door-2 alarm unit, connect reed switch S2 near the magnet of gate 2. Wire IC2 also as a frequency oscillator and set door-2 alarm frequency between 5 and 7 Hz using VR2. For door-3 alarm unit, connect reed switch S3 near the magnet of gate 3. Wire IC3 also as a frequency oscillator and set door-3 alarm frequency between 10 and 12 Hz using VR3.

The power supply required to operate the alarm circuits consists of a bridge rectifier and filter capacitor C10. In normal condition, i.e., when all the doors are closed, reset pin 4 of IC1 through IC3 remains low. As a result, these do not oscillate and piezobuzzer PZ1 remains silent.

When door 1 is opened, the magnet moves away from reed switch S1. IC1 generates 1-3Hz signals and the piezobuzzer beeps to indicate that door 1 has been opened. When door 2 is opened, IC2 generates 5-7Hz signals and the piezobuzzer beeps to indicate that door 2 has been opened. Similarly, when door 3 is opened, the piezobuzzer beeps at the rate of 10 to 12 Hz, indicating that door 3 has been opened.

Fig. 2: Circuit of remote buzzer unit
Thus sitting in a room where the buzzer unit is fitted, you can easily know (through the typical sound of the buzzer) which room has someone gained entry into.

Assemble the circuit on a general-purpose PCB and connect the output to any socket (SOC1) inside the building as shown in Fig. 1. Mains line wire is not connected to SOC1. Live and neutral wires are connected to the primary of the step-down transformer, which is a part of the power supply. All the three units connected are powered from a single rectified power supply. Connect the reed switch near the particular gate magnet through an external wire.

Plug-in the piezobuzzer into the earth and neutral lines of socket (SOC2) fitted in the desired room of the same building. There is no need of laying external wires up to the buzzer unit. This project will work off the power line within the building.

EFY lab. In the buzzer unit, a zener diode (ZD1) is used as the voltage between earth and neutral is around 9V instead of 0V. If you find the ideal voltage difference of zero volt between earth and neutral lines, the circuit will work even without ZD1 in the circuit

Thursday, May 23, 2013

Convert WASTE BASKET into a spy robot

Circuit Theory


Circuit


 Description

For  description please click here


tags: spy robots, electronics projects, inventory projects